


Hello, love muffins! Today I want to talk about blog customization. I'm no website designer, but I think I've done a pretty decent job of swank-ifying ye olde blog here (there's still more work to be done!) and I thought I'd share some tips and tricks as I go along.
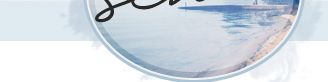
Today we're going to start with one of the most obvious elements on your blog - your header! That's the big picture at the top. :)
Now, blogger has all kinds of header styles you can choose from, but they tend to fall a little flat design-wise. So, why not make an awesome one of your own!?
I'll show you how I made my current header, and it was way easier than you might think. So, off to Photoshop!

First, you're going to want to create a new image. For a cohesive look, you're going to want to make your header the same width as your blog. My blog is 1000 pixels wide (more on how to adjust that later), so that's the width I'm going to make my header. I didn't want anything too tall, so my total dimensions are 250x1000 pixels.

Next, input your type. This is going to create a text layer over your background.
For the "watercolors" in the background, I downloaded two sets of free watercolor brushes. If you choose to also do so, just click on the folder and open it up once downloaded, and they should automatically load into photoshop.

There are a lot of fun preset brushes in photoshop, so play around with sizes and textures until you find something you like.
For my header, I set my brush size to 300 px and the Opacity to 65%, so the colors would show through each other like real watercolors.

Save your image! Whenever I'm using graphics for a website, I always like to save as a Portable Network Graphic (.png). They always retain their image quality very well.
And now you have your very own custom blog header.
Come back tomorrow and I'll show you how to install it in blogger.
Sources:
Bebas font from font squirrel
Pee Pants Script from dafont
Thanks so much for this tutorial! I just applied it to my blog and it had made a world of difference from the original option.
ReplyDeletewebsite design